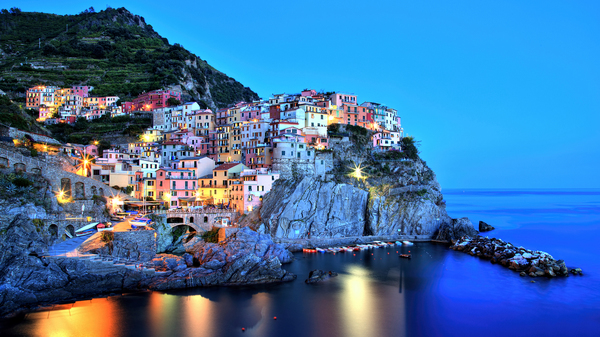
The Blue Hour
The blue hour refers to the darker stages of morning and evening twilight, when the Sun is quite far below the horizon, coloring the sky deep blue. Like the golden hour, it is a favorite with painters and photographers.

Manarola, Cinque Terre, Italy. The contrast between the deep blue sky and the glow of artificial light sources makes the blue hour an ideal time for urban photography.
©bigstockphoto.com/Roman Slavik
The moments when 99% of people see sunlight
Definition of the Blue Hour
On a clear day, the transition between day and night can be a colorful spectacle, with the indirect sunlight tinting the sky yellow, orange, red, and blue. The blue hour refers to the phase of twilight when the Sun is so far below the horizon that the light's blue wavelengths dominate.
Because the blue hour is a colloquial term, it doesn't have an official definition similar to dawn, dusk, and the 3 phases of twilight. Rather, it refers to a state of natural lighting that usually occurs at daybreak in the morning and during the last stages of twilight in the evening.
However, the blue color spectrum is most likely to emerge when the Sun is between 4 and 8 degrees below the horizon. By this definition, the blue hour encompasses parts of both nautical twilight and civil twilight.
The Sun's angle in your city—click on the table
Why Is the Light Blue?
The different colors of twilight are created by atmospheric effects. As the solar elevation angle—the angle of the Sun above or below the horizon—changes during the transition between day and night, different wavelengths are filtered out by the Earth's atmosphere, leaving the remaining rays of light to color the sky in ever-changing hues.
The distinctive color of the sky during the blue hour comes from red light being absorbed by ozone in the upper atmosphere. This is different to the scattering process that produces a blue sky during the day.
Does the Blue Hour Last for 60 Minutes?
The duration of the blue hour depends on both the latitude and the season. In locations where the Sun is directly overhead at noon—for example at the equator during the equinoxes—the Sun traverses the horizon at an angle of 90°, making for swift transitions between night and day and a relatively short blue hour. For example, in Quito, Ecuador, which is very close to the equator, it takes the Sun only about 16 minutes to move from 8 to 4 degrees below the horizon.
At higher latitudes, the same process takes longer. At around 40 degrees north and south, for example in New York and Wellington, it takes around 20 minutes in March. In Oslo (about 60° north) and the northernmost tip of Antarctica (about 60° south), the blue hour lasts roughly 30 minutes at that time of the year.
In and around the polar circles, blue is usually the predominant natural color during the winter months, owing to the comparatively low solar elevation angle and the slow rate at which it changes. In areas that experience polar night in the winter, the Sun may not move higher than 4-8 degrees below the horizon at noon, creating a blue hour that can last for several hours.
Blue Hour Photography Tips
The blue hour is treasured by photographers for its saturated colors and its calm, mysterious mood. Since the light is soft and has a very high color temperature during that time of the day, it is best suited to capture motives that include artificial light sources, such as cityscapes, buildings, bridges, or monuments. Besides urban environments, the blue hour may also work well for landscapes, as long as they include areas with warm light to contrast the blue backdrop.
To capture the magic of the blue hour in your photos, try following these guidelines:
- Plan ahead. The blue hour is short—too short to start fiddling with your equipment and settings when the light is just right. Use timeanddate.com's Sun Calculator to find out when the Sun will be at just the right angle at your shooting location (click on a row in the table for a solar elevation graph). Make yourself familiar with the destination and turn up with some ideas of the subjects and angles you wish to capture.
- Use your smartphone. Most new smartphones help you take great images during the blue hour. A lot of the cameras have an HDR (High Dynamic Range) function that makes sure that the sky and your subject is exposed nicely.
- Adjust to light levels. Light levels are low, so, depending on your aperture, you may need a higher ISO setting than during normal daylight hours.
- Use a wide aperture. Using a wide aperture during the blue hour will make lights, such as street lamps or fairy lights, soft and magical.
- Or use a small aperture. A small aperture and a tripod will allow you to capture all the details in a landscape. Play around to find the best combination. High ISO settings can add grainy “noise” to the image.
- Use a tripod. A tripod and a slow shutter speed will help you to capture warm light from your surroundings against the contrast of the darkening blue sky.
- Try the flash. To highlight a subject in the image, you can use a flash. Expose for the skies behind and aim your flash at your subject.
- Shoot in raw. If you are using a DSLR or another type of advanced camera, shoot your images in RAW or TIFF format. Processing the image after will let you enhance the cold colors of the blue hour. The largest version of a JPEG also allows for some editing.
- Play around. Experiment with apertures, flash, and shutter speeds. Your memory card is the limit.
Find out when the Moon rises and sets in your city
When is Venus, the evening star, visible during the blue hour?